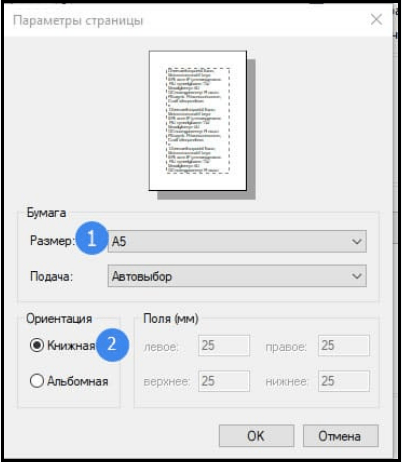
Otras instrucciones:
Guía para crear una foto del resumen
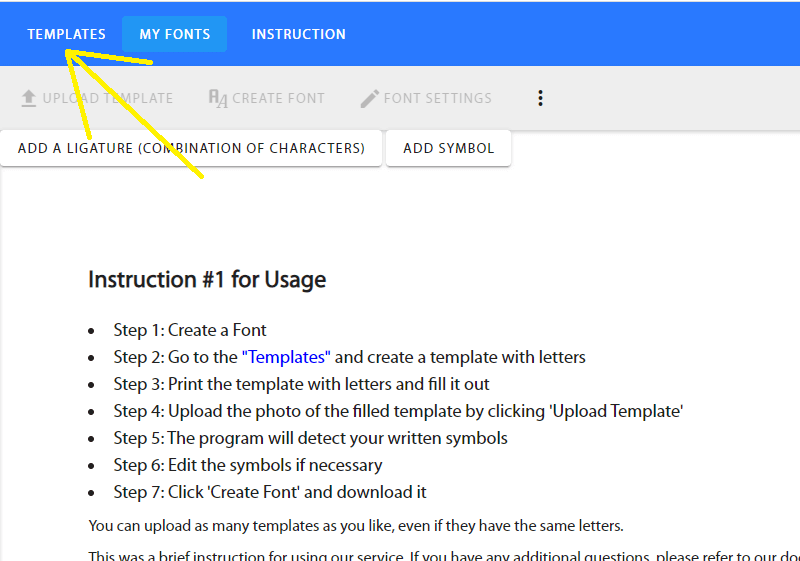
Guía para crear tu propia fuente
FAQ
Guía para imprimir texto en la impresora
¿Cómo funciona?
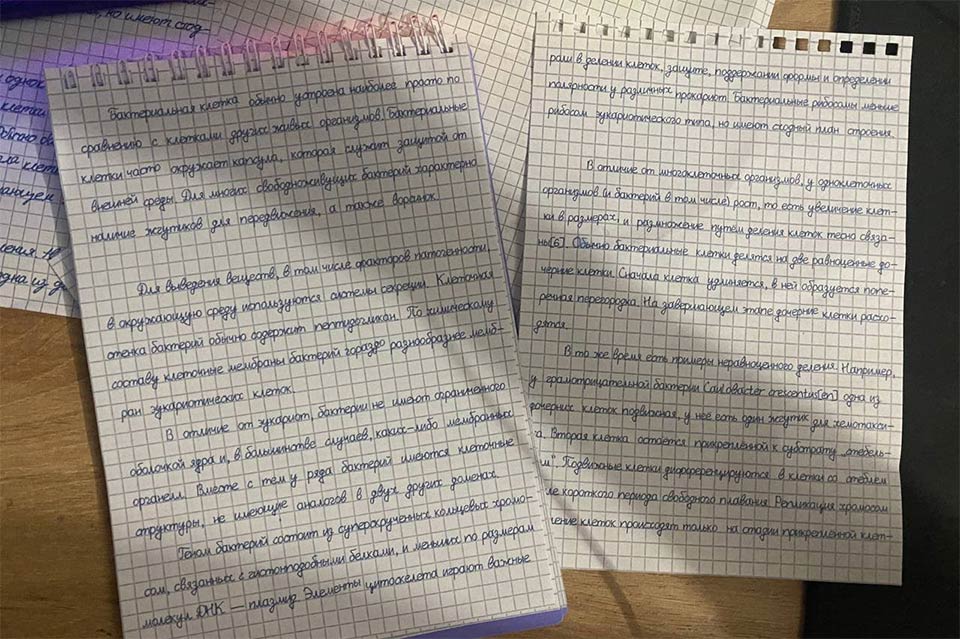
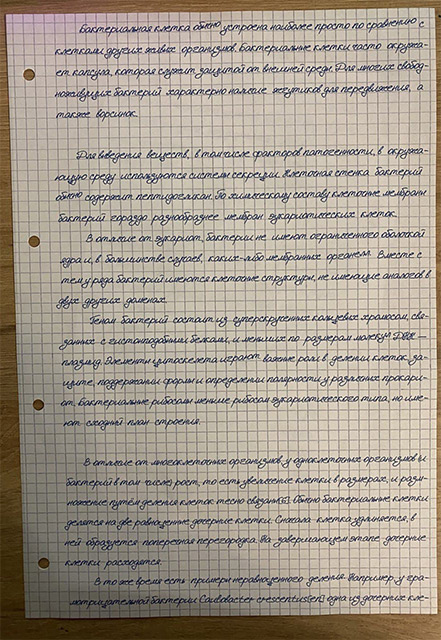
¿Estás cansado de escribir notas? ¡Nuestro servicio te salvará de esto! Puede traducir cualquier texto escrito en el teclado o desde Internet a algo como un escaneo o una fotografía de su cuaderno y mostrarlo durante el aprendizaje a distancia (u otro). Todo ya está configurado para usted, simplemente seleccione un fondo (si es necesario, hay 16 disponibles) y una fuente (si es necesario, hay 54 disponibles), inserte el texto y haga clic en "Crear un resumen", luego podrá descargar el resumen en forma de foto o pdf.
Puede leer más sobre la configuración haciendo clic en el "signo de interrogación" al lado de la configuración.
Si esto no funciona, siempre puedes imprimir las notas en tu cuaderno imitando la escritura a mano. Ábrelo e imprímelo a través de un navegador o mediante un programa (por ejemplo Adobe Acrobat Reader DC). ¡Cómo imprimir correctamente se describe a continuación!
Necesitas establecer el margen superior correcto (abajo se indica cómo hacerlo)

3. Configuración para imprimir
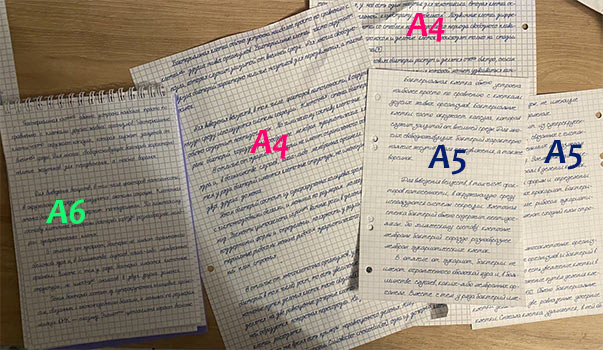

Selecciona en la configuración automática tu formato de hoja o crea el tuyo
Hoja de bloque A4 | Hoja de bloque A5 | Cuaderno A5 con espiral a la izquierda ((Formato no estándar)) | Bloc de notas A6 con espiral arriba
Este es el formato estándar A4, compatible con todas las impresoras. Las hojas de bloque pueden tener diferentes márgenes superiores (la primera celda está recortada de manera diferente), para imprimir directamente en la celda, debes especificar el margen correcto. Más detalles
Este es el formato estándar de papel A5, compatible con la mayoría de las impresoras. Las hojas de bloque pueden tener diferentes márgenes superiores (la primera celda está recortada de manera diferente), para imprimir directamente en la celda, debes especificar el margen correcto. Más detalles
Este es el formato estándar de papel A6, compatible con la mayoría de las impresoras.
(Formato no estándar)
Antes de imprimir en el cuaderno necesitas crea el tuyo doblar cuidadosamente el espiral y sacar las hojas.
Para crear un formato de papel no estándar, mide la hoja con una regla:

Haz clic en "Crear" aquí. Cambia a milímetros:
Ancho: 165 mm
Altura: 210 mm
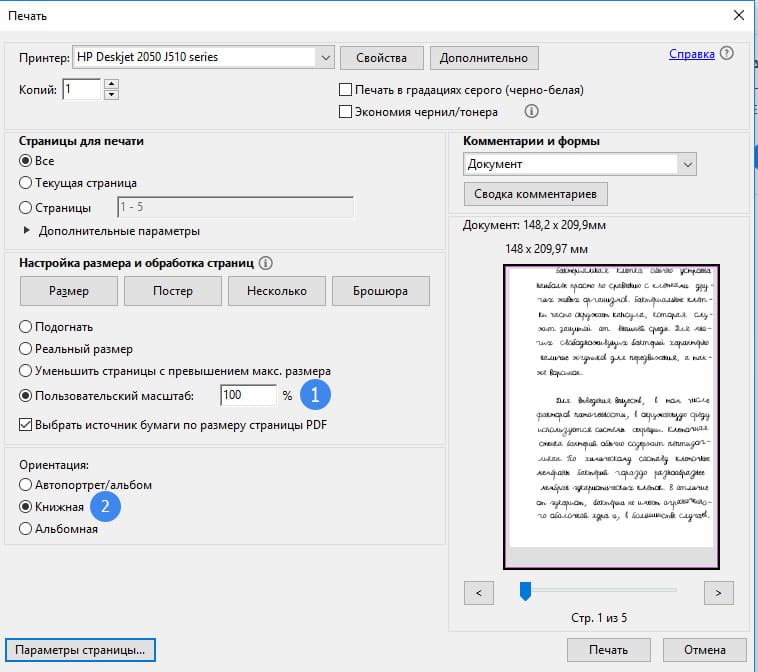
Después de crear el formato para la impresora, debes marcar la casilla "Seleccionar origen de papel por tamaño de página PDF" y "Tamaño real":
Marca las casillas para el origen del papel y el tamaño real.
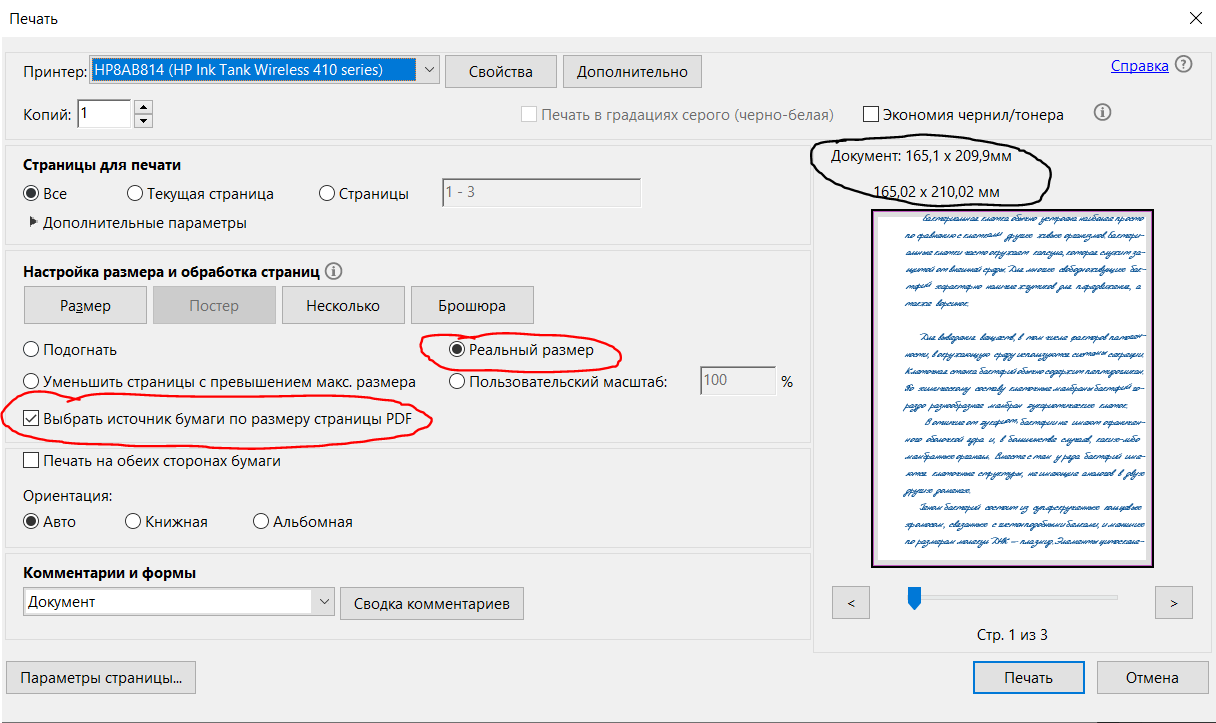
Si creaste el formato correctamente, los números por encima del resumen (resaltado en negro) serán iguales. En nuestro caso es 165x210 mm (formato del documento PDF creado y formato que admite la impresora). (formato del documento PDF creado y formato que admite la impresora.).
Es necesario indicarlo correctamente para que todo se imprima exactamente en el cuadrado. Se calcula de la siguiente manera: La sangría desde el inicio del cuaderno hasta el final de la primera celda donde comenzará el texto es MINUS 6,5 mm. La sangría puede ser diferente para todas las hojas (incluso si las hojas pertenecen a la misma pila). A menudo sucede que las sangrías se alternan. Por ejemplo, la primera hoja de papel tiene una sangría de 8 mm, la segunda tiene 5 mm, la tercera tiene 8 mm, la cuarta tiene 5 mm... Si especifica la sangría incorrectamente, todas las líneas se borrarán al imprimir.
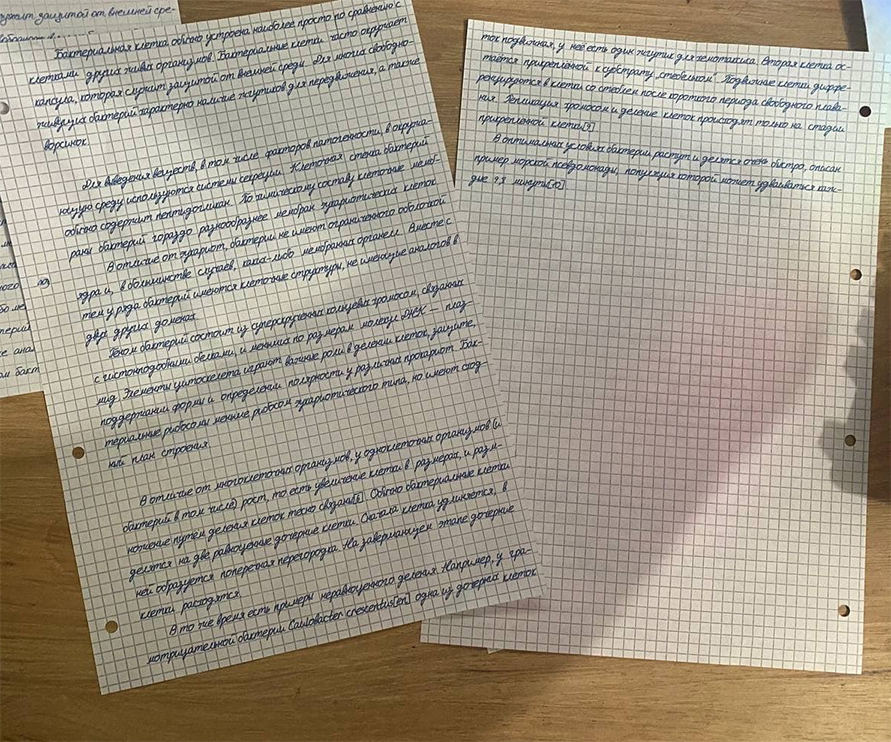
Ejemplo de error con diferentes márgenes superiores:
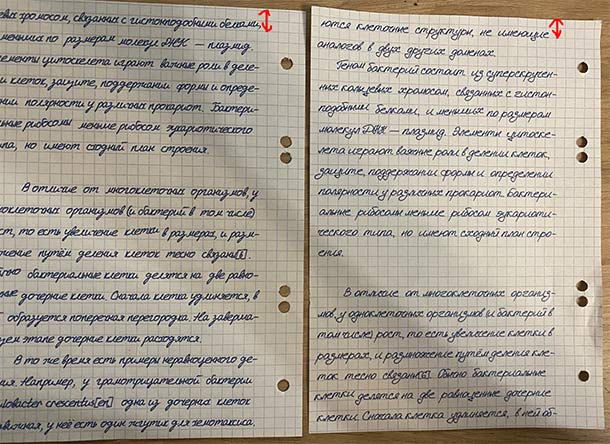
Aquí se muestran dos hojas del mismo bloque con diferentes márgenes superiores. Como puedes ver, al especificar incorrectamente el margen superior (hoja izquierda), las líneas no encajan en la celda.
La sangría a la izquierda y a la derecha (dependiendo del número de hoja) no debe ser igual a 0, porque todos los cuadernos tienen márgenes o agujeros. Es posible que la sangría en la parte inferior no tenga que hacerse completamente, porque la hoja puede ser más grande de lo que la impresora puede imprimir (como en la foto)
Es mejor indicar la distancia no 10 mm, sino de 10,01176 a 10,07176 mm. (largo de una celda o línea + ancho de la línea de celdas o líneas dibujadas) El desglose de los valores depende del ancho de la línea de celdas dibujada.
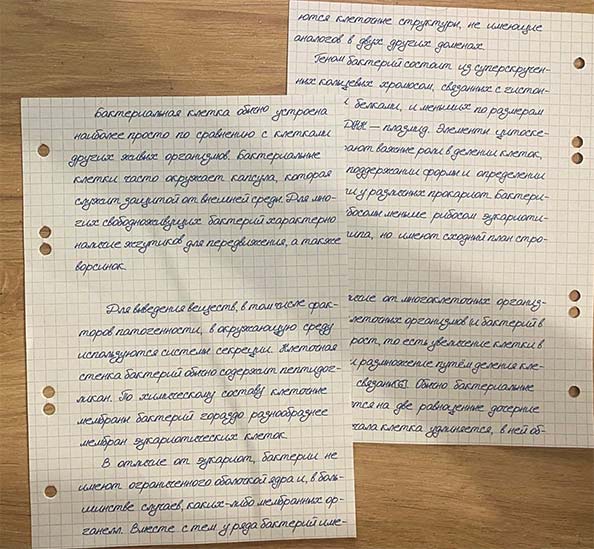
Ejemplo con espacio incorrecto especificado:
Aquí especifiqué un margen de 10.07176, y debería haber sido 10.01176. Como puedes ver, hacia el medio se hizo evidente que las líneas se deslizan hacia abajo de las celdas.
Hacer que los campos sean “espejo” en cada página. Función imprescindible para imprimir en una libreta, porque al hojear las páginas de una libreta, los agujeros para el bloque o para la espiral (resorte) pueden estar a la izquierda o a la derecha (dependiendo de la hoja).
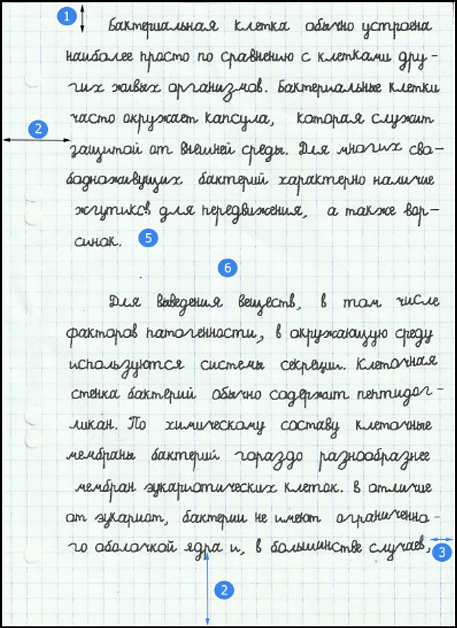
En el campo de entrada de texto, cada párrafo es el comienzo de una línea (el final del párrafo está marcado con el número 5). ¡¡Después del párrafo hay una “línea roja”!!
Si falta una línea (vacía) en el campo de entrada, ¡se agrega un espacio en lugar de este espacio!
1.Coloca todo como en la imagen:
A continuación, procedemos a la impresión propiamente dicha
Se coloca hacia abajo el lado donde se midió la sangría desde arriba. Primero imprimimos páginas pares. Los agujeros para el bloque o para el resorte deben estar a la izquierda.
2.Haga clic en opciones de página:
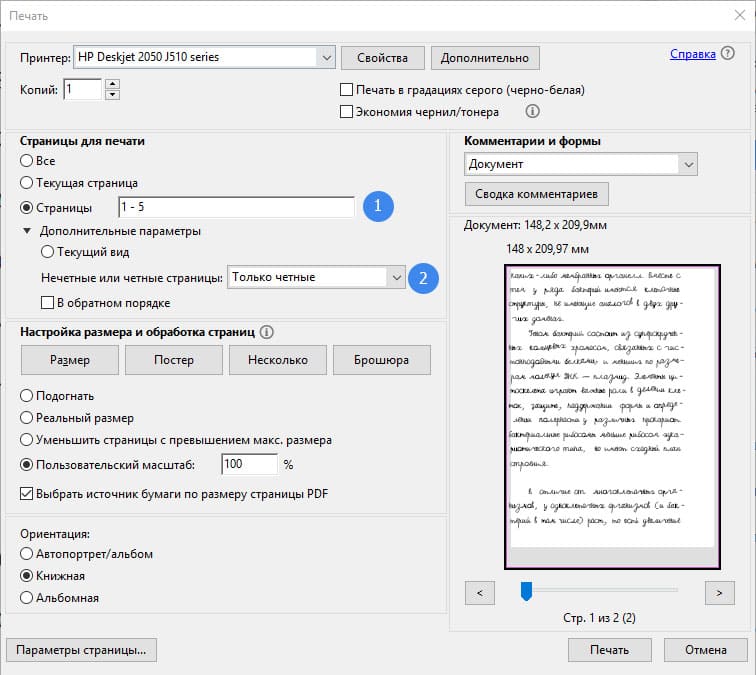
Luego cogemos las páginas impresas, las ponemos del otro lado e imprimimos las páginas impares. Los agujeros o márgenes deben quedar a la derecha.
La configuración de su impresora puede variar. Además, es posible que la impresora no admita algunos formatos.